Wednesday, January 27, 2016

Feel Better Pasta

Feel Better Pasta


Let me start by saying that there is nothing healthy about this meal.  This pasta is a special occasion dinner which I only seem to make after I’ve had a horrible day or if I am really, really sick.  It makes me think of my mom and being a kid and it’s just soooo yummy!


This dish originates from my mom.  When I was a kid she would use leftover spaetzle (a german noodle type of yummy goodness) to make this dish.  Since I don’t have the time or patience to make spaetzle, I had to improvise!  Cue the rotini noodles and the rest is history.  This is a super yummy meal for those cold winter days… comfort food at its finest!  I hope you enjoy it as much as my whole family does!


Ingredients
  • 1 lb. box Rotini pasta
  • 2 - 8oz. bricks swiss cheese (shredded)
  • 2-3 onions, depending on size
  • butter (2-3 Tbs. depending on how many onions you use)


Instructions
  1. Start noodles and boil according to directions on box.  I prefer to leave them a little al dente for this recipe.
  2. Peel and dice onions.
  1. Put butter in large frying pan and brown onions on low heat.  Make sure they are nice and caramelized.  
  2. While onions and pasta are cooking, shred Swiss cheese and set aside.  I use the large side of a box grater but a food processor will work too.
  3. Once noodles and onions are finished take a large bowl and start layering your ingredients.  It’s best to do this when the pasta and the onions are still warm so they can melt the cheese.  I layer with noodles, then cheese, then onions.  Repeat 3 times until all ingredients are used.


  1. Cover dish and let stand at least 10 min.  If cheese is not fully melted you can heat up individual portions in the microwave.
  2. This recipe always needs salt no matter how much you add while cooking! Be sure to add to taste, it makes a HUGE difference!
  3. ENJOY!  

Tuesday, January 26, 2016

Health Break

New Year, New Thing


So I hear you made a NY’s Resolution...

One basic thing

Every year at this time millions of us make New Year’s Resolutions.  We are pushing ourselves to make a permanent change. The type of change that will make us more efficient, healthy,  frugal, and more happy. Within our goal of becoming more healthy there are PLENTY of options and benefits. We could add or subtract a myriad of things in multiple combinations that can have GREAT impact on our bodies.  
I don’t know about you all, but I swear I am never going to make a resolution again but every year I fall prey to the pressure to be a better me.  And as January 1st rolls around I get SO goal oriented.  It could be the previous night’s (NYEve) drinks catching up with me and putting me in a mindset that it ripe for goal setting.  OR it is that I really love the thrill of thinking that this is the year, this is my moment, this is IT (I envision myself like Charlie Brown before he attempts to kick the football the Lucy is so generously holding)! Then realism set in around February 1st, I simply resolve to  just try to be a better, smarter me.
This year shall be different!  This year I will conquer my ONE simple goal!  This is MY year to follow my goals!  


Hey Ma! Look at me! I’m simplifying...

I’ve come to notice in my 30 years of resolution making that I set some lofty goals for myself.  One year I was going to travel the world, solve world hunger and find a boyfriend. For the record, i only achieved one of those and even then it only lasted about 6 months.  
So I have resolved myself to ONE resolution.  Are you ready…
Eat better breakfasts.
Silly right?  Almost idiotic, childish, and overly simplistic.  Simple is where I am AT!  Sitting here I can think of about 100 other things that I would LOVE to tackle in my 2016 Resolutions, i.e., drink more water, read more books, take Tai Chi, take an art class, learn a language, begin using an organizational binder, swim the Gulf of Mexico, grow an Avocado plant, build a treehouse, make pallet furniture, become a notary public, learn how to make sushi, eat less meat, eat more veggies, learn more carpentry skills, learn how to knit, blah, blah, blah - blabbity blah blah.  So as you can see I am really struggling to just keep it to ONE. Can you relate?
So by better breakfast, what do I mean? How about no Pop Tarts, no Captain Crunch, and no Chocolate Frosted Sugar Bombs to start with?  I mean I am no health guru but I know that starting my day with all that sugar is A) not good for me and B) not good for me. This means replacing my sugar with something.  So I’m posting 3 of my favorite recipes here and I will provide a list of some website to find more.
My new favorite,
Mini Egg Casseroles or Muffin Tin Scrambled Eggs
(Photo Credit to: (www.rollerderbyathletics.com)
  • 8 strips of turkey bacon (cooked then crumbled)
or
  • 7 slices of Canadian Bacon (diced then cooked)
  • 12 eggs
  • 1/4 cup chopped onion
  • 1/2 cup chopped green bell pepper, or Field Grown Red, Green, & Yellow Peppers
  • 1/2 teaspoon salt
  • ¼  teaspoon ground black pepper
  • ¼  teaspoon garlic powder
  • ¼ teaspon dry mustard
  • ½  cup shredded Cheddar cheese
Preheat oven to 350 degrees F (175 degrees C). Lightly grease 12 muffin cups, or line with paper muffin liners.
Cook bacon however you do, microwave, skillet, oven.  Just don’t put RAW meat in these.
Beat eggs in a large bowl. Stir in onion, green pepper, salt, pepper, and garlic powder. Mix in your meat of choice and Cheddar cheese. Spoon by 1/3 cupfuls into muffin cups.
Bake in preheated oven until a knife inserted near the center comes out clean, 20 to 25 minutes.


Yogurt Smoothies
pictured is a  Yogurt based Blueberry Banana (Photo credit to: www.womendailymagazine.com)
  • ½ cup Blueberries
  • ½ cup vanilla or blueberry Kefir Yogurt,
  • 1 whole banana
  • 1 cup 1% milk smoothie)
Blend well in your blender (you can add ice to make it more frosty and thicken a bit)
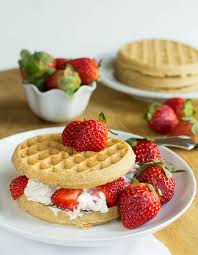
Cream Cheese, fruit and waffle Breakfast Sandwich
(Photo credit to: Link)
  • 2 toasted waffles (I prefer whole grain or blueberry)
  • 1 cup of sliced berries
  • 1 Tbsp whipped cream cheese

Spread tbsp of cream cheese onto both waffles place berries on top and place berried/cream cheese sides together. Tada!

I know the last recipe sounds so basic and easy but honestly sometimes it's just about thinking outside the waffle!
So now that I've got you thinking how this could work for you, you can search the web to find more.  Some sites I visit regularly for healthy food ideas and good feedback about whether the recipes work are:


We might ask ourselves (in February when we are doubting ourselves), what’s the point of all this morning work?  I mean we are taking a good portion of our morning for food planning!  What are the benefits to my simple plan? I will only tell you of the benefits that I have noticed in myself thus far:
  1. Decreased daily appetite (throughout the whole day)
  2. When I start with less sugar and go for more protein based morning nutrients my cravings for all the yummy bad stuff is minimized.  
  3. MORE EnErGy!!!
  4. (this one sounds crazy but bear with me) Better brain functioning.  I haven’t been forgetting so much and I have been retaining thoughts better too.  I think this is due to more energy and just a better stream of calories to pull from.
Here’s to our endeavor to better ourselves!  Simplify and seize our goals in 2016! (We will make it and Lucy won’t even get the chance to pull away the football before we get there!) Bon Apetit!

Friday, January 15, 2016

Tomato Cage Tinsel Trees

So I have seen plenty of these floating around on the internet, starting in as early as September. Some people just wrap the lights around the tomato cages and call it day. Those are fine too.  I like the version with the tinsel as it looks very festive in the day as well as at night.
A couple a things…
If you are doing this in January you are saving yourself some serious moolah $$  as your materials, such as lights and tinsel are on CLEARANCE right now at most stores. And if you use materials i.e., tomato cages, spray paint, bricks or zip ties that you already have even more savings. I had old tomato cages, zip ties, spray paint, pots, and bricks lying around so savings and upcycling!
One last thing, when I attempt these projects I am going to tell you ALL about them.  The Good, the Bad and the Corrections.  One of the reasons I am starting this whole endeavor was to share with you my mistakes and faux paus so you don’t have to.  Maybe we’ll call my DIY projects the “Cautionary Tales.”  

Let’s Begin!

Materials needed:

3 Tomato cages (You could do 2 but I like the look of the 3 together)
1 roll of heavy duty twine
a lot of tinsel (I will explain in more detail)
1 can Green spray paint
2 strings of 50 lights
1 string of 100 lights
1 pkg of zip ties (which I didn’t think to use until I was almost done with the project)
3 large garden pots
7 large bricks


Lay out your tarp and put your tomato cages down so you don’t get paint everywhere. Ties the tops of the tomato cages into a tee-pee top, where are three legs come together. Tie very tight.  (little secret here, i forgot to do this in the “before” and had paint ALL over my hands when I was done - chalking that one up to my excitement to do this project) Added benefit of doing it before you paint is that the twine is then hardened and painted to match at the end of your project!


Normally, I would lecture here about the importance of prepping your material to be painted.  In this particular instance we don’t care.  All we are looking for is stickiness.  You can use spray adhesive (but this is cheaper) AND it will disguise the tomato cages under the tinsel. Plus I can see where I have sprayed. So spray away! Just make sure you have good coverage.

Now you could do these trees individually. But I am afraid I am always a little time crunched to wait for the perfect environment/time.  Why am I telling you this?  Because things get a little hectic in this project for just a little bit.  So you waited for the paint to get a little tacky and really quite sticky.  Good job!  Pull out your first string of tinsel (probably 12 ft or more) and start at the top by tucking the end into the tacky twine and getting it good and stuck in there (I wrapped mine around the tee-pee top a little bit for added security).

So on the biggest cage I used 4 strings of 12 foot tinsel and it was a sparse at the end. On the small cages 4 strings were just enough to do a good job of coverage.  So if you are covering the larger tomato cage use at least 6 strings of tinsel.

Once all cages are covered, I let them dry overnight.  I wanted the tinsel good and stuck in that paint.  AND it was!  Now you cover with the lights.  Start at the top by threading the “female” plug into the top of the tee-pee.  Wrap around evenly so as to spread lights out.  (something I thought of later as added security to the lights staying in place better were zip ties.)  Take zip ties and tie the lights onto the cage and tinsel. (about 5 or 6 per tree) Cut the ends of zip ties off or spin them inside of the tomato cage. Make sure the “male” plug has a little extra length at the end to reach your plug.

Now pots.  I chose to put mine in pots, reason being that a lot of the time when I am decorating the outside of my house for Christmas it’s already sub-zero temperatures. Have you tried putting stakes in the ground when it is frozen?  Measure the opening of your pots to ensure that the cages will fit down inside them all the way to the bottom.  Place cages in pots and slip the bricks down inside the cages trying to cover a bit of the bottom wire of the cage with at least 1 brick.  I chose bricks because a) I am not a fan of pea gravel or limestone rock.  b) it’s what I had lying around.  And as I stated before this project was a 2 parts I want to try this and 1 part what do I already have lying around that I could use for this project (upcycling).

This step was tricky but it kept the cages secure in high winds, toppling the whole tree as compared to the tree rolling around in my front yard unsecure.  (We had 60 mph winds the VERY first day I put these up)


Voila!  Gorgeous decorations for WAY cheaper than you could buy at Target or Home Depot.  

Making a Menu Board


I have been wanting to tackle this project for months.  I was super motivated to get all the supplies, and then to the back burner it went!  Well, now this project has it’s time to shine :)

My main reason for doing this is to start being better with meal planning, shopping, and making healthier choices for dinner.  Let's begin!!!

Gather your materials:
* 14x11 magnetic whiteboard like this one (Whiteboard Link)  

* Picture frame for 14x11 photos (make sure it is deep enough for the magnet board to fit inside).  My frame is close to an inch deep and the board fits inside perfectly.  I purchased my frame at Hobby Lobby when they had a crazy sale so it was very affordable!

* Washi Tape - this can be any pattern or color you want

* Paint color cards - I went and grabbed a bunch from Home Depot.  Free and tons of colors in the perfect size!


* 3M Command Velcro
* Ruler
* Permanent Marker

1.  The first thing I did was measure out the line on the whiteboard.  I divided the board into 8 sections and I made the top one a little larger.  If I ever get a Cricut Explore I’ll make a cute name for up there but for now, I hand wrote our name.


2.  I cut out strips of colored paper from the paint strips.  I used my nerdy paper cutter that I have from my teaching days so that they were all the same size.

3.  To make the board a little cuter, I used the washi tape around the edge of the board.  Then I put the board in the frame and used the 3M velcro to stick it up to the wall.  It is important to make sure you check to see that the magnet board will fit completely into the frame.  If not, the board will have no way of sticking to the wall.

4.  I gathered up my magnets and then I was ready to go!

The thing that kept holding me back is all the recipes and ideas for meals.  The OCD in me wanted everything done and labels printed to use on the board.  When I finally got going, I just decided to hand write meal ideas as we went along.  It’s not as pretty as I would like but it’s working and we love it!  


For the future:

I will continue to handwrite the meals but once we have a good database, I will go back and print labels with my label maker.  If you don't own a label maker yet, I highly suggest you invest in one.  I also think I will leave room to maybe add sides to the menu, but right now, that's way too much :)

When OCD Takes Over:  

I will color code the cards to match the main protein in the meal.  Or maybe I'll add sides.  Or maybe both.  Who knows what might happen when I get going :)

Russian Thumbprint Cookies

During the holidays this year I was looking for a "new" cookie to try. One that was buttery and good with a cup of coffee or tea. Something fun for the kids to help me with AND most importantly easy to make (because who really has time for all this baking during the holidays anyway). So we love Kolasczki cookies and the kids had asked to learn how to make them, well after a lot of groaning and whining (on my part), I read that these tasted similar. We tried them and to our surprise they are everything we wanted and more! So when searching for said deliciousness, I first found links to the recipe on a Russian baking website (thank you Pinterest). Which is why I named our version the
Russian Thumbprint Cookie. (Also Called Buttery Jam Thumbprints).


Ingredients needed:


  • 1 cup salted butter, softened
  • ½ cup confectioners' (powdered) sugar, plus ¼ cup more for dusting
  • 2 teaspoons pure vanilla extract
  • ¼ tsp table salt
  • 2 cups all purpose flour
  • ½ cup fruit preserves (I used raspberry & blackberry)
Directions:
Preheat oven to 325°F. Line a baking sheet with parchment paper.
In the bowl of a stand mixer fitted with paddle attachment, blend butter and sugar until fluffy and light, 2 minutes. Add vanilla and salt, scraping down bowl as needed. Switch to low and gently mix in flour, just until combined. Don't over mix.
Roll tablespoonfuls of dough into 1-inch balls. Place dough balls on parchment lined baking sheets. Press down the center of each ball with a spoon (or your thumb!) making a slight depression.
Fill cookie centers with a teaspoonful of preserves. Bake 12-15 minutes or until golden brown and puffy, but take care not to overbake. Let cool a few minutes on baking sheet, then transfer to finish cooling on wire rack.
When cookies are completely cooled, dust with confectioners' sugar. Cookies can be kept in airtight container at room temp for a few days.